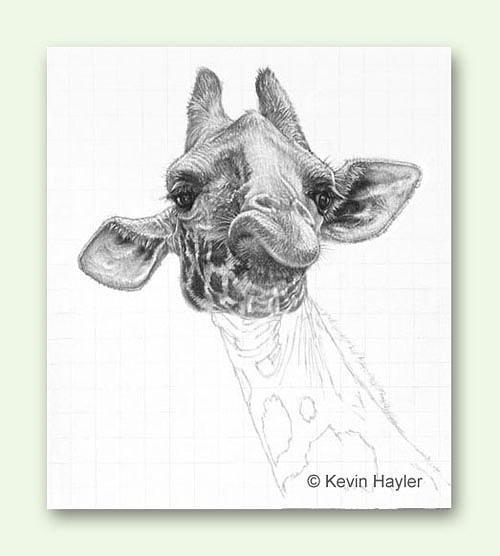
How to Draw a Giraffe Really Easy Drawing Tutorial

The web is dominated by cartoons and drawing tutorials by people who really can't draw very well. I'm going to show you how to draw a realistic giraffe with a pencil.
These are the basic steps you will take to draw a realistic giraffe:
- Grid the photo and paper
- Draw the giraffes outline
- Draw the giraffes eyes
- Draw the ears
- Start Drawing the giraffes face
- Deliniate the mouth and add the giraffes horns
- Add missing detail to the face and draw the neck
- Add the spots, mane, and creases
- Complete the giraffes face and neck
- Erase the grid lines and add flicks of hair
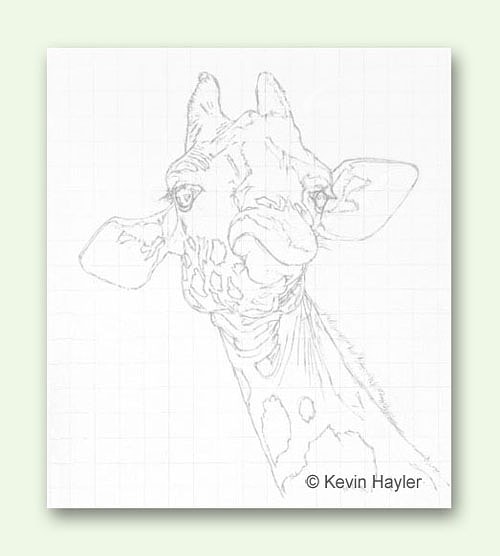
- Finished Giraffe Drawing
In this tutorial, I will show you my process in reverse. First, we will start with the interesting bit and draw a realistic giraffe. Then I'll show you the process which leads up to the drawing. There is far more to it than you might think. Let's go.
(I get commissions for purchases made through links in this post. However, I only promote products I like and recommend)
The Giraffe Drawing Begins
Step 1: Draw the Outline of Your Giraffe
I like to use an HB Derwent Graphic Pencil (affiliate). Sometimes I'll draw just the outline, at other times I'll roughly shade the dark areas. It depends on my reference photo and how easy I think the drawing will be.
N.B. I have a quick guide to choosing the right pencil grades, take a look.
I invariably map in the outline accurately using a grid. This is how I do it.
Drawing the Grid
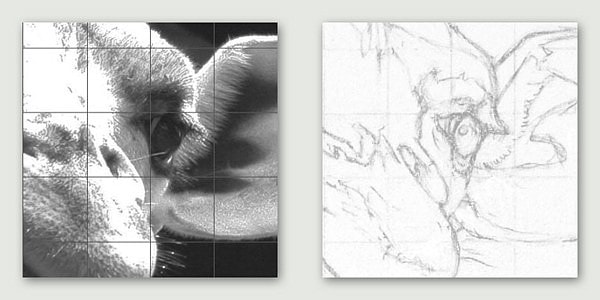
Drawing a grid is tedious. There is no way around that. The more confidence you have in your ability, the larger the grid can be.
Use a lighter grade of pencil and don't press too hard when you draw your lines. The last thing you need is score lines. They must be light enough to erase and dark enough to be visible guidelines.
Not my video but it explains the process clearly
A middle to light grade will do. Personally, I use a Derwent 2H.
If you want to use a larger grid there are two hacks to help you out.

Use a pair of dividers (affiliate) and starting at a corner point, measure out to the area you want to draw, in this case, the eyeball. Do the same on your drawing and pencil in the correct mark. Do this as many times as you want.
The other way is to draw diagonals across the square box. Like this:

Follow these instructions to draw in the whole image. Pay extra attention to the key focal points. In the case of a portrait, that would be the eyes.
When you are happy that the key areas are true to life and placed properly, it's time to start the drawing process.
For extra help, you can check out these classes on Skillshare (affiliate)
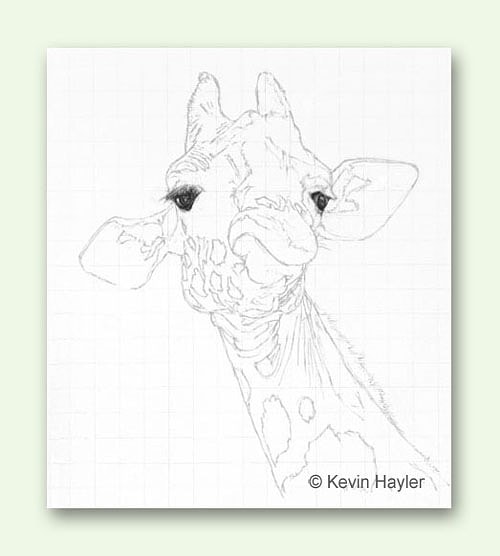
Step 2: Start Drawing the Giraffes Eyes
I always start with the eyes, they are the life and soul of the drawing. Get the eyes wrong and it doesn't matter how good the rest of the drawing is, it will always fail. A cross-eyed giraffe is gonna be a cross-eyed giraffe.
At this point, I swapped my general pencil for a Pentel Mechanical Pencil (affiliate)
N.B. I love using these pencils, you should try them out: Can You Draw With Mechanical Pencils? Yes, and Here's How
I started with a 0.3mm (B) lead. I didn't draw the darkest darks in one go. I built the darks up in layers. It's far easier to erase softly drawn layers than one heavy layer.
There was no black spot for a pupil. If you look at the eye carefully they appear as a series of adjoining darks, some deeper and others reflective. You are trying to recreate the depth.
The trickiest part of getting the eyes to look aligned is the final sparkle. They MUST be placed accurately. The highlights are usually the only white areas, everything else is normally a grey tone, including the 'whites' of the eyeballs.
You can draw around the sparkle, or if that goes wrong, you can lift out the highlight with a Battery Eraser (affiliate).
You can draw the finest detail with a battery eraser: How to Draw White Lines in a Pencil Drawing (Without Going Mad)
Don't rely on the eraser to always bail you out. It depends on your drawing finesse. If you make a heavy-handed error you can't guarantee that the white will return.
If the graphite is indented into the paper surface you will lose the paperwhite. You could try to regain the sparkle with, gouache, chalk pencil, or even paper correction fluid, but I'd rather start again if I screwed up at this stage.
It's far better to be careful and not press down so hard that you can't erase the graphite.
Before we finish with the eyes, you might notice how prominent the eyelashes are. Giraffes are famous for having big eyes and long lashes. There is no harm in slightly exaggerating the features.
Use your artistic license to emphasize some areas and to play down others.
You are under no obligation to stay faithful to the photo. You can tweak and adapt everything as you go.
Step 3: Start Drawing the Giraffes Ears

Having drawn the giraffe's eyes and buoyed with success, I decided to draw both ears. There was no logical reason I should draw them next beyond maintaining my confidence. I thought they would be relatively easy. I find it helps to build on small wins.

I shaded the skin with the side of the pencil and picked out the fine hairs with a Jakar Battery Eraser (affiliate). I drew the veins by dragging a Tombo Mono Eraser Pen (affiliate) over the graphite and shading one side to add depth. I added lots of micro hairs fringing the ear with a 0.3mm Pentel Mechanical Pencil (affiliate)
Step 4: Draw the Second Ear
It's a case of duplicating the method to draw the other ear. Why reinvent the wheel. Keep to the same pencils and techniques.
I used 2H and 4H for the lighter areas and 2B for the dark areas. I used 0.3mm pencils throughout the drawing.
I don't use blending stumps (affiliate) very much and didn't use one at all in this drawing. All the tonal variations were drawn in and adjusted by dabbing the graphite with a Putty Eraser (affiliate).
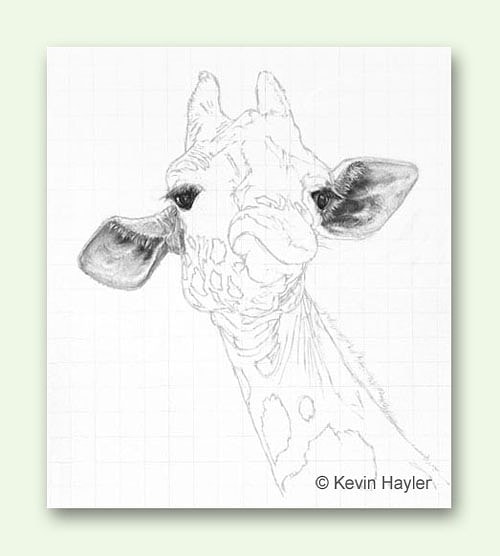
Step 5: Start Drawing the Giraffes Face

It made sense to start drawing the left side of the face where I had the most detail to work from in the photo. I used a B grade and gently hatched in the spots. I used a chamfered lead to retain the texture of the paper and produce a speckled effect.
TOP TIP: Swipe the mechanical pencil lightly across some fine emery sandpaper regularly to maintain the sloping edge. Make it a habit after every few strokes.
I drew in the wrinkles under the eye and shaded the underside to make them more 3D.

Step 6: Draw the Giraffes Horns and Define the Mouth

Things are going well and I stay on the left side and draw in the top eyelids. I draw some longer white whiskers around the mouth with a Tombo Mono Eraser Pen (affiliate).
I will adjust tones as I go. When drawing piecemeal, one section at a time, the danger is getting the overall tonal values disjointed. I will darken and lighten areas I've already completed as, and when, I need to.
Now I shape the lips and emphasize the mouth with some reflected light at the base of the top lip.
I add some more light hairs which contrast nicely against the shadow.
Step 7: Finish Drawing Most of the Giraffes Face
Now we are definitely getting somewhere. I draw in the right horn, exaggerating the fur texture slightly. The left horn retains the darker shadow and I reconstruct the central boney ridge, which is lost in the original photo.
The creases above the left eye are clearly visible in the reference and I use them as a guide to match the right side.
I can draw the darks in the nostrils easily enough and using the little detail that exists in my reference, I begin to fill in the white space along the bridge.
It's a calculated guess as to how the shadow would lie. I could've been more adventurous with the contrast, but I was keen to fill the bleached area.
I used a linear contour to indicate the bulbous shape above the right nostril. It's not photographic and you would never see that line in real life, but it does the job.
Step 8: Increase the Contrast and Begin Drawing the Giraffes Neck
The features were slightly lost and lacked definition so I made the shadows darker. The light is coming from the right side so the left-hand shadows had to be stronger. I paid some attention to the bump on the forehead. I wanted it to be more obvious in my drawing than it is in the photo.
This fine adult male giraffe had an aristocratic way with him, and I didn't want to lose that. That bump was part of his character.
I used a 2B and made the nostrils very dark, as they should be.
With the face looking more 3D I could start to draw the neck.
The folds are a key part of the charm and I had to draw them in with a sure hand. They had to be spaced out well or things would look awry.
Step 9: Draw the Giraffes Neck, Spots and Mane

The neck folds are looking authentic so I carry on with the theme. I make sure one side of each crease is in deep shadow.
Again I use the texture of the paper to produce a grainy effect. It simulates the appearance of short fur.
I draw in the mane using a sharp edge and criss-cross the lines. I follow the line of growth but in a random way. Parallel lines will look artificial so they are to be avoided at all costs.
Drawing the lines this way will produce tufts and highlights in the process. Darken a few gaps between the tufts to give the mane some depth.
You'll notice that the shadow is at the base.
Step 10: Finish the Neck and Complete the Face

I draw the remaining spots with an HB using light cross-hatching to build up layers. I darken the middle of each patch with a B using the chamfered tip I mentioned earlier.
I noticed some raised nodules on the photo and I was keen to include them so I lifted out some dots with a piece of Blu Tack (affiliate) and added shadow.
I find that Blu Tack (affiliate) lifts graphite more easily than a Putty Eraser (affiliate).
The markings have no sharp edges, they are roughly defined. The lighter fur zig-zags into the darker patches. I used a sharp pencil point to draw tiny jagged angles.
There are ways to add texture: How to Draw Texture in Pencil: 7 Tips for Fast Results
Moving back to the right side of the face I add texture to the light areas. I lost a bit of contrast but the added detail compensates.
Step 11: Final Giraffe Drawing and the Finishing Touches

The last stage is to tidy up the drawing. I readjust some shadows and redefine any lost areas. I add flicks of hair here and there and erase any grid lines still showing in the background.
You can learn: How to Draw Realistic Shadows in Pencil (All The Best Secrets)
Time to sign it.
Then I put the drawing away for a while. Any glaring mistakes will be more apparent looking at it with fresh eyes. In fact, looking back at this drawing now, I can see areas that I could rework. In that sense, a drawing is never finished.
That's the fun bit, but where do you get the image in the first place?
Read this for a full answer: Where to Find Wildlife Subjects to Draw, Paint, and Photograph
If you have got this far I'm assuming that you want to know everything, so let's cover it.
Where to Get a Giraffe Image to Draw
It goes without saying, you'll need an image of a giraffe to copy. Of course, you can grab an image online, but where's the fun in that? If you are drawing for fun, there's no harm done, but you'll have to source your photos legally if you want to sell prints.
Read this before you act, it covers copyright: Can You Copy Art and Sell a Painting of a Painting? I Found Out
Don't get paranoid, but if you need to know the laws on copyright, you'd better seek out a professional like Erica on Skillshare (affiliate)
You have 3 choices:
- You can seek permission from the owner of a photo,
- Buy a stock photo,
- Take your own photos.
It's far better to take your own reference photos that way you'll have the satisfaction of knowing that everything you do is 100% your own work.
Read this for guidance: Is Drawing From Reference Photos Bad? Are You Cheating?
In an ideal world, you'd jet off to Africa and go on safari, in fact, I did just that with this image. I went to Kenya and visited Giraffe Manor. It's an old colonial manor house on the outskirts of Nairobi where, for a hefty fee, you can stay the night and feed the giraffes from the window.
If adventure appeals to you I can help: How to Plan a Wildlife Photography Trip (A Detailed Beginners Guide)
Or you can visit for the day. Needless to say, I was a day visitor, £7 ($10) is more my kind of budget.
Realistically, you could, and should, visit a zoo. Find out when the animals are fed and time your visit to get the best action.
You'll need a reasonable zoom function on your camera but don't think you need top-of-the-range gear, it's not essential. You can turn a mediocre photo into something special with a little know-how.
This post will show you: How to Plan and Compose Your Art: A Guide for Beginners
I use an insanely affordable Lumix bridge camera. It's been updated and called the Panasonic Lumix FZ80 (affiliate) or FZ82 outside the US. It's great for safaris.
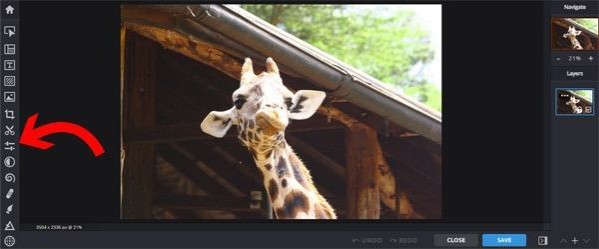
This giraffe portrait is a case in point. I'm embarrassed to show you the photo, it's appalling. The settings were all wrong, half the detail is blown out. Nonetheless, the pose was too good to ignore and I was fairly confident that I could rescue the image.
Take my advice and maximize your chances of taking some reasonable shots. Point your camera and let rip. Take more photos than you'll ever need.
Sorting through them all when you get home is a pain, but somewhere hidden amongst all the dross are the gems you can work with.
How to Prepare Your Giraffe Photo For Drawing
Now you have gone through all your photos and selected your best pose. Now what?
It probably needs tweaking to bring out the lost detail and enhance the contrast.
I use a very old version of photoshop elements. You don't actually need it, but it's handy.
For a crash course on the basics of Photoshop I chose these 3 on Skillshare (affiliate) but there are more.
Pixlr.com (affiliate) is a free online alternative photo editor that gets the job done.
They have two versions just to make life complicated, one is called Pixlr E, and the other is called Pixlr X.
Pixlr E is very basic, but with no learning curve. Pixlr X has more bells and whistles and is designed for keen amateurs. In this demo, I'll use PIXLR X (affiliate).
For this tutorial, all you need to know is how to convert the image to black and white, adjust the highlights, and overlay a grid.
If you want a simpler way to add a grid try using the free tool by Art Tutor. It's a bit clumsy and I don't agree with everything said in the video, but it's good enough for most people.

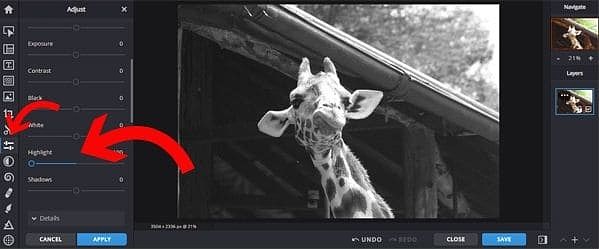

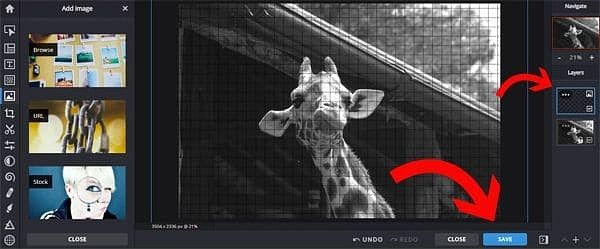

Not only have you got a slightly better image to work from, but it's also gridded. That will save you a ton of work. The grid I've used is small, but you can upload a larger grid if you like.
This was done with the free version of Pixlr.com, but you can also buy a pro version (affiliate) and get more features with no ads. It's a great option if you want to have a fully functioning photo editor without having to download yet more software. It's all online.
Alternatively, you can download photoshop elements, that's what I use most of the time. It's very handy but it's not intuitive and takes time to learn.
Your other option is to download Gimp. It's open-source software that echos Photoshop. It's free but there's an even steeper learning curve.
The next step is optional.
Print Your Giraffe Photo and Make a Photocopy
I like to work from physical images. I find it easier than working from a computer screen. It's a matter of personal preference, but there is one major advantage of doing it my way.
I can make several photocopies/printouts in various sizes and choose the size that I feel comfortable drawing. I copy it size for size.
All I need to do is draw an accurate grid to the same dimensions. This is critical. You can't be a millimeter out. It must be exact. If things go wrong it's likely to be at this stage.
Why is this so important? Why not scale the drawing up or down? You can of course, but the reason I want to draw to the same scale is ease and time. There is less room for error and it takes so long to draw anything I want to speed things up where I can.
This post will show you how to do it: How to Scale Up a Drawing in 4 Easy Ways to Save Time
This is my whole process.
Drawing a Realistic Giraffe – Final Thoughts
As a professional artist, my finished drawing is ready to print and there's yet another huge process involved in preparing it for publication.
A great deal of work goes into making a successful drawing. The layman may think that it's all about passion and spontaneity, but that's far from the truth. It takes planning, patience, and application.
And finally, don't be fooled into thinking that professional artists instinctively know how to draw their subjects. Things go wrong all the time. I like to think of each work of art as a series of mistakes and their corrections. It's only finished when you can't think how to correct it anymore.
It's hard work making a drawing look easy.
Now if you want to paint a Giraffe, take a look at this. I found this class on Skillshare (affiliate).
If you like the way I draw and want to try things for yourself, this is my basic kit: (Amazon affiliate links)
- Pentel Mechanical Pencils 0.3mm
- Derwent Graphic Drawing Pencils
- Daler-Rowney Heavyweight Cartridge Paper
- Jakar Battery Eraser
- Tombo Mono Eraser Pen
- Faber Castell Putty Eraser
- Blu Tack
Want an alternative to Amazon? Check out ARTEZA Art Supplies (affiliate)
Now all you have to do is sell your work! That's your next step and it's easier than you think. It's all laid out in my guide; step-by-step.

If You Want to Sell Your Art
Check this out!
Psst…it's only $12.99!
These posts may also interest you too:
- Drawing Ideas for Adults: 120 Cool and Easy Things to Draw
- How to Find Your Drawing Style: 8 Ways to Develop Your Skills
- Tracing Art – Is It Good or Bad? When Is Tracing Cheating and Is It Ever OK?
- How to Create Depth in Your Drawing: 7 Expert Techniques
- How to Repair Drawing Paper: 9 Ways to Rescue Your Artwork
- What's The Right Paper for Pencil Drawing? (How to Choose Wisely)
- How to Draw a Forest Background the Easy Way
Plus find an ONLINE COURSE that suits you.
PIN IT AND SAVE IT

Source: https://www.wildlifeartstore.com/how-to-draw-a-giraffe-realistically/
0 Response to "How to Draw a Giraffe Really Easy Drawing Tutorial"
Post a Comment